The Emergency Alert System is an add on feature to the Pikmykid Dismissal platform.
At Pikmykid, we know how important it is to stay prepared for safety incidents big and small. Our Emergency Alert System is easy to set up and should be a priority at your campus. We have outlined the steps below so you can check this off your list and feel prepared for an Emergency or Drill.
If you’d like to skip to text only instructions click here.


Additional Notes:
- Pikmykid recommends including the emergency alerts as part of your usual safety drills.
- All staff should be familiar with how to activate an emergency alert and next steps.
- Please ask your staff to update their mobile numbers in their Pikmykid profile in the upper right of the portal. This will help with communication alerts during an emergency.
- You will be able to upload custom emergency documents in your portal if you choose (on the left side bar under Emergency Resources)
- We recommend also setting up our Student Reunification feature to complete your emergency planning.
Setting Up Your Emergency Alert System
- Login to your Pikmykid School Portal on any web browser
- Choose the settings wheel in the upper right corner and click “Emergency”
- Start by choosing the “Contact Group” tab. Here you can add contacts who are outside your school staff or create sub groups of your staff. There are some types of emergencies that only select staff should be notified. Some example groups are Admins, Nurse, Fire, and Police.
- For each contact added you will provide their name, phone number and can select how this number should receive the alert– text, voice or both. Your local fire and police can advise you on what numbers to put here for them.
- Once have set up your contacts, you will customize your messaging. Choose the “Messages” tab. We have preconfigured a set of standard emergency types and verbiage to get you started.
- You can:
- Edit messages with the pencil icon
- Delete messages with the trashcan icon
- Create a new message entirely
- Drag & Drop to reorder messages by most used or priority
- You can:
- Click the pencil icon & edit a message.
- You can change the title, messaging, and icon
- Choose which recipient groups should be alerted (may need to refresh page to see newly created groups)
- Choose to include follow up instructions
- Enable chat between recipients (see usage instructions for an example)
- Follow up instructions can be sent out after the initial message and can be sent to all recipients or just the person who reported the emergency
- Ex: For a FIRE you may want instructions to be sent to everyone
- Ex: For a medical emergency it may only be necessary for the reporter
- Choose the “Settings” tab. Here you should fill in your school name to prefix all alerts and toggle on the emergency options. We recommend allowing any school staff to report an emergency and allowing users to input additional info when reporting (this will allow details like room number to be entered on the fly). Once you “Enable emergency notifications” staff will see the option to report an emergency in the lower left of the portal.
- For staff to receive alerts on their phone please ensure their mobile number is listed in their Pikmykid staff profile. You can add this as an administrator (settings wheel > general > staff > pencil icon) OR they can click their profile in the upper right and add themselves.
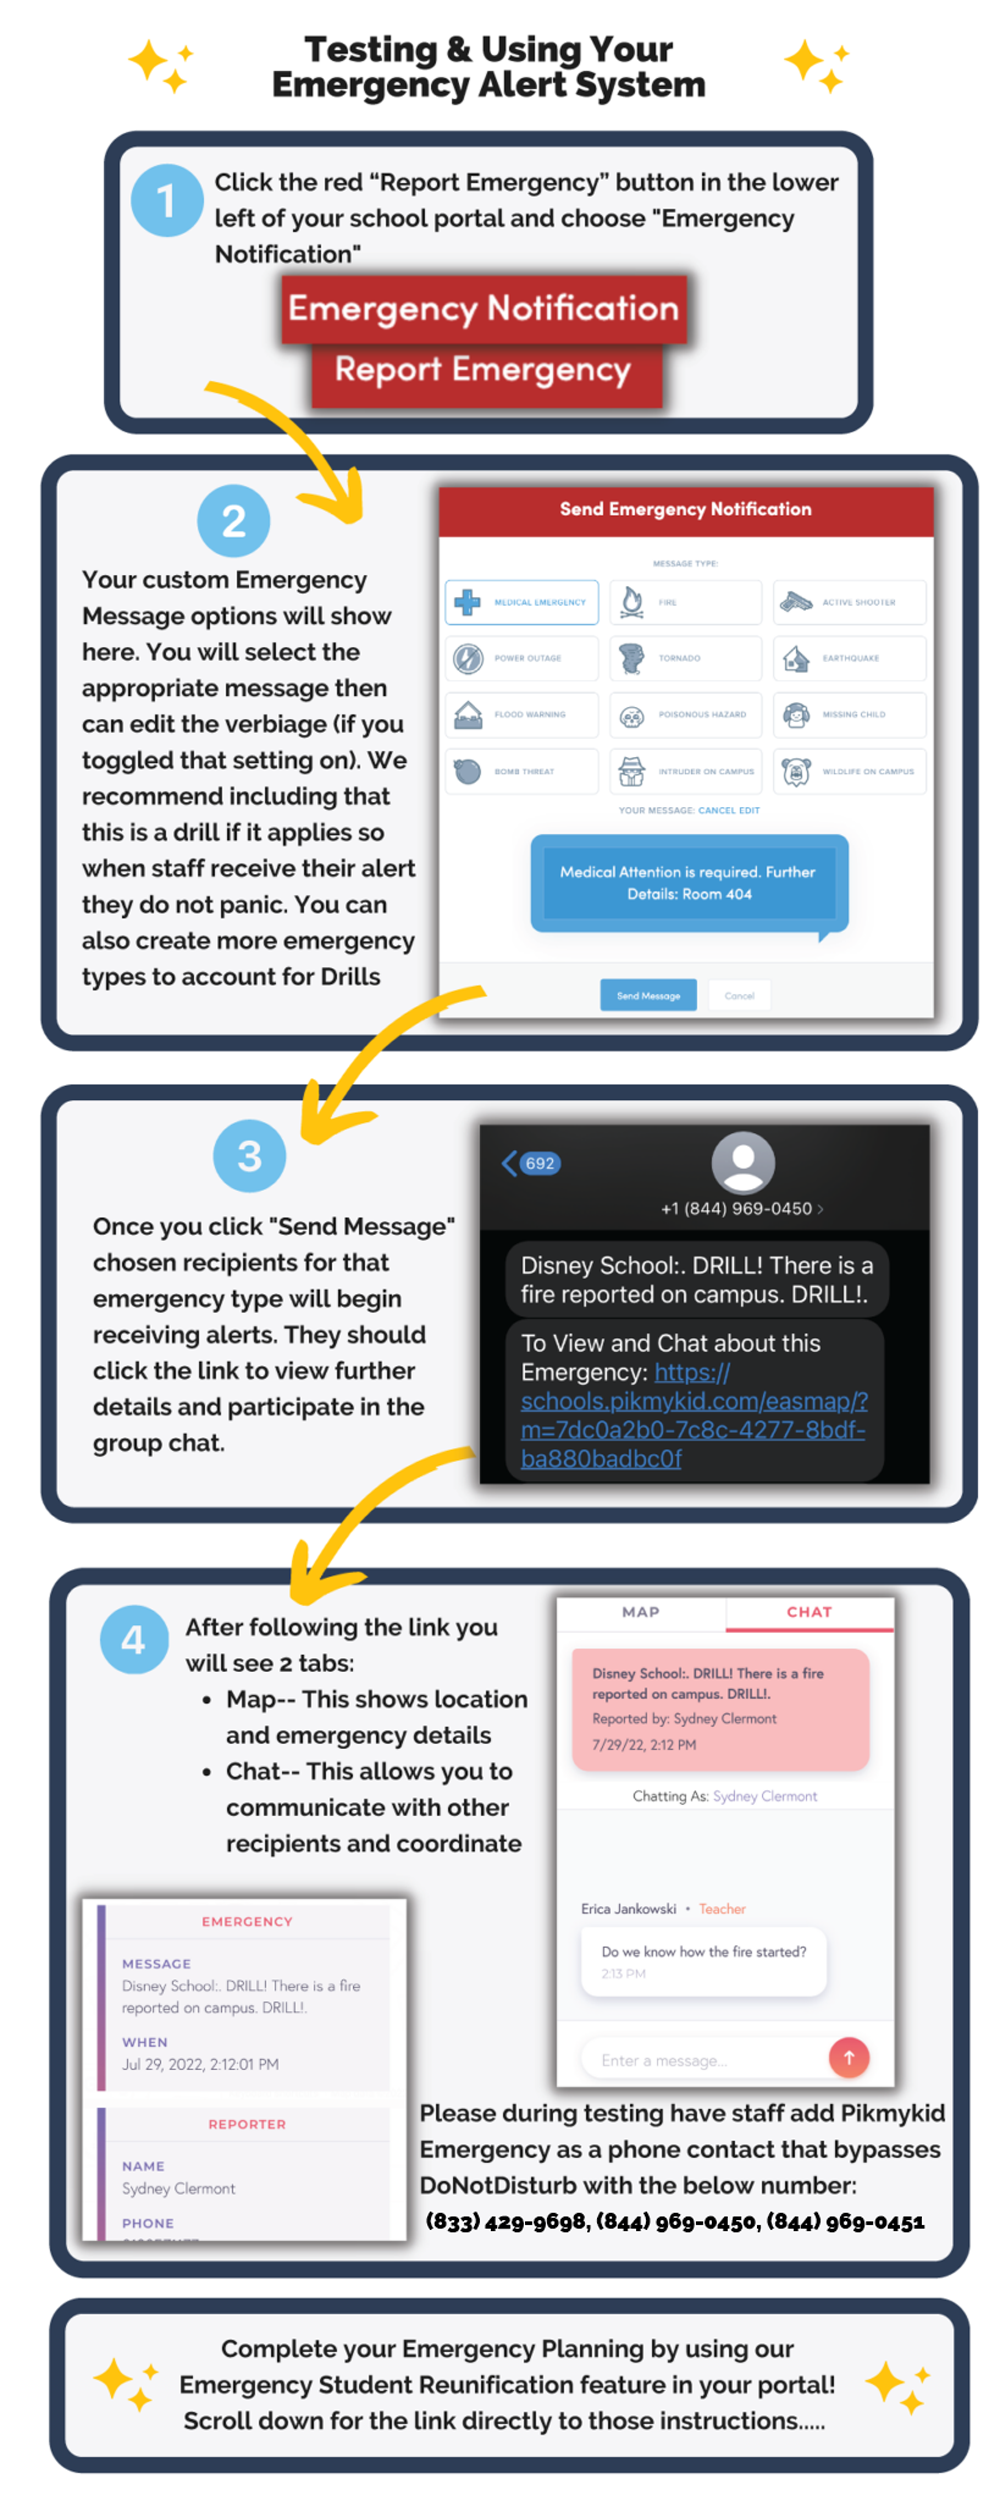
Testing & Using Your Emergency Alert System
- Click the red “Report Emergency” button in the lower left of your school portal and choose “Emergency Notification”
- Your custom Emergency Message options will show here. You will select the appropriate message then can edit the verbiage (if you toggled that setting on). We recommend including that this is a drill if it applies so when staff receive their alert they do not panic. You can also create more emergency types to account for Drills.
- Once you click “Send Message” chosen recipients for that emergency type will begin receiving alerts. They should click the link to view further details and participate in the group chat.
- After following the link you will see 2 tabs:
- Map– This shows location and emergency details
- Chat– This allows you to communicate with other recipients and coordinate
- Please during testing have staff add Pikmykid Emergency as a phone contact that bypasses DoNotDisturb with the below numbers: (833) 429-9698, (844) 969-0450, (844) 969-0451
- Complete your Emergency Planning by using our Emergency Student Reunification feature in your portal!
